

Photo by Matthew Osborn,
on Unsplash
I give a lot of presentations to customers and I tend to create a lot of new slides for the presentation decks I use. I’m also a huge fan of Presentation Zen, the book and the blog, as well as Duarte Design’s blog, with their excellent slide:ology book. When giving technical presentations about computer hardware or software though, sticking to good presentation principles is tough at best.
But there are a few simple tips that everyone should follow when preparing a presentation, and I hope to collect a few of these in this new category. Today’s topic is simple, almost trivial, but powerful. And I see too many slides on an almost daily basis that violate some basic graphical principles:
The Art Of Borrowing Images
It’s about stealingborrowing images from awkward sources (such as PDF documents) the proper way.
Let’s assume you want to include someone else’s slide, but only have the PDF version of the other person’s document. You’ll therefore have to somehow work with a screen shot of the PDF document in your own slide. Done badly, this could result in something like a Frankenstein slide-inside-the-slide thing that simply looks awkward and unprofessional.
Another example might be a technical illustration from a PDF document (or a complex image that you found on the web), that you want to include in your presentation, but it looks ugly because it’s been cut&pasted; including some differently colored background or with some graphic elements that didn’t have anything to do with the subject of the slide.
Or, and this is classic ugliness, an image is resized to fit it’s new surrounding, but now the aspect ratio is distorted and suddenly that cool new gadget looks too fat, or strangely thin and tall, but not at all attractive any more.
Example: A Typical Bad Cut-and-Paste Slide

As an example, the image to the right is a badly designed slide: I just took the Visual Panels slide from my OSDevCon 2009 talk (no link, sun.com no longer exists), saved it as a bitmap and included it into a different slide template. A lot of things are wrong here:
-
The slide has two different titles, and in different fonts.
-
The OpenSolaris logo and CI of the “stolen” slide is not intended to show up in the “outer” slide design (assuming it’s a different company for the sake of argument).
-
There’s not enough room for the diagram, so it appears too small and its text is hard to read.
-
The image has been stretched horizontally to fit better, but now the fonts look weird and the laptop and the server look a bit unnatural.
-
The background of the outer slide template doesn’t shine through, you can clearly see that this is just a foreign slide inside another slide.
-
The bullet points are not editable text, they don’t fit the “blue” design theme and what if you wanted to have them in a different language?
Proper Image Inclusion Principles
To avoid accidents like the above (and I’ve seen a lot of these in my corporate life), here are some important things to keep in mind when cutting and pasting other people’s images into your own presentations:
-
Always use images you’re allowed to use, and attribute them properly: Respect other people’s rights, make sure you have permission to use images (especially when found on the web!) and include an attribution if necessary. It never hurts to ask and most owners of photos, images, diagrams etc. are glad to give you permission if you ask nicely about including their work.
-
Choose the best source possible, at the highest resolution: The best source is the original (vector-)drawing, or photo, or original slide. Try to get it from the original author. If that isn’t possible, try to get a resizeable format of the picture (like a PDF) and make it fit the whole screen, with a maximum zoom factor (but so that the image is still visible as a whole) before making a screen shot. This should give you enough pixels to work with so the image looks fine even after some cropping, resizing etc. This works especially well with company logos or product pictures from PDF brochures.
-
Always reduce the source image to its essentials: Cut out unnecessary headers or footers from the source slide if any. They are not part of your (or your company’s) design. Eliminate text, too, because you should add it later using your presentation tool’s text boxes, in your own preferred words and language and with your proper text font and colors. And real, vector text tends to look much better than bitmapped and resized text from some pixel image. You can easily eliminate unwanted pieces with your favourite graphic editor (I recommend The Gimp which is available for Oracle Solaris, OpenSolaris, Linux, Mac OS X, Windows and almost any other platform for free). Below is a short guide on how to do it.
-
Keep the aspect ratio right: The human eye (well actually your brain) knows a lot about the right proportions of stuff and it is very sensitive to aspect ratio distortions. An unevenly resized machine, product, photograph, etc. will always be detected as such, and it will distract your audience from whatever point you want to make with your presentation. This is very easy to do: Always keep the shift key pressed when resizing an image, this will force the presentation tool (I recommend OpenOffice for the same reasons as The Gimp) to keep the aspect ratio correct at all times. And if you’ve accidentally lost it, you can always select “Original Size” (or a similar option) and properly resize from there again.
-
Use transparency: When putting together a more complex diagram out of individual pieces, they sometimes overlap and pieces of background accidentally cover pieces of diagram. Or maybe you have a background of one color, but the background of the image you want to place on top is different. Again, this can look ugly, unprofessional and distracting. This is when using transparent backgrounds becomes important. It may be a bit tricky to do at first, but it’s easy to learn and you’ll be rewarded with seamlessly fitting and properly backgrounded images to impress your audience with. Below, you’ll see a short tutorial on how to apply transparency to any given picture.
How To Separate The Wheat From The Chaff In Images
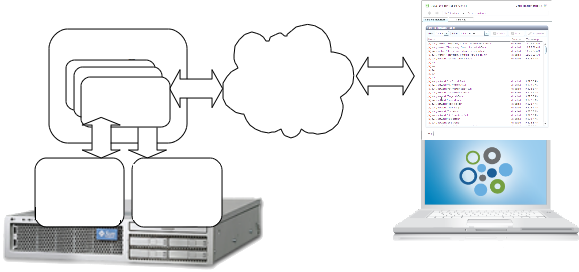
Here’s the same diagram as above, but properly separated from its slide. Notice that the text has been wiped away, so you can add your own text in a font that fits your design well. Also, the rest of the baggage like the original slide elements and design are gone, giving you the freedom to embed this diagram into whatever slide template you want to use. Finally, the image has a good enough resolution so it won’t look ugly even if you decide to use it at a big size.
Here’s how to properly separate the diagram from the slide screenshot:
-
Maximize the window size of the PDF (or whatever) viewer and increase the zoom level until the diagram almost fills the whole screen.
-
Perform a screenshot with whatever tool your OS uses.
-
Load the image into GIMP. On OpenSolaris, you can easily install it as “SUNWgnome-img-editor” from the Applications->Graphics and Imaging section of the Package Manager.
-
Use the rectangular selection tool (hotkey: “R”) along with Edit->Fill with FG/BG color (“CTRL-,” or “CTRL-.”) to get rid of Text and other stuff you don’t want in the image. Use the Color Picker Tool (the eyedropper icon, “O”) to pick up the right color, if the background you want to wipe to is different from black or white. Advanced users may want to use the clone tool (“c”) on photos as well.
-
Use the rectangular selection tool with Image->Crop to selection to crop the image to a minimum size. Use the Autocrop image function in the same menu to reduce the image to the smallest necessary footprint.
-
Now use the fuzzy select tool (the “magic wand”, “U”) to select the background of the image. You will need to add multiple selections together until you have selected all of the background. You can do that by holding down the shift key while tapping background regions with the magic wand. In this exampe, the piece of background between the two boxes on top of the server needed an extra selection. If you’ve accidentally selected too much, you can revert the last bit by selecting Edit->Undo (“CTRL-Z”). You can also combine magic wand selection with rectangular selection, just remember to hold down the shift key so selections are added up together. You can also subtract areas from the current selection by holding down the CTRL key while selecting what you want to un-select. This sounds a bit complicated, but will quickly become second nature once you experiment a bit and get the hang of it.
-
Once you’re happy with your selection and think you have selected everything that belongs to the background, select Layer->Transparency->Add Alpha channel (only needed once per image), then Edit->Clear (or the “Delete”-Key). The background will disappear and you’ll see a checkerboard pattern where the image is transparent. You can always undo this step and correct your selection if something went wrong, or continue turning other parts transparent with the selection tools and the Delete key.
-
Once you’re happy with the outcome, be sure to save the image in the PNG (no link, opensolaris.org no longer exists) format so the transparency is preserved.
The Result

It wasn’t that hard, was it? It took me about 5 minutes to free the above diagram of excessive baggage, and you’ll get the hang of it pretty quickly, too. Now we can put it into our own slide template as well as choose our own kind of text inside and around it, as you see in the nicer version of our example slide on the right:
-
We can now reduce the amount of text to the minimum, so there’s more room for the diagram.
-
Since we chose a good resolution, there are no jaggies or other resizing artifacts.
-
We can apply the right kind of fonts to the image and choose how to name what part, as we like.
-
The image has the right aspect ratio so nothing looks distorted.
-
The background of the image is now transparent, so it blends nicely with the background of the slide. This gives us a sense of the image belonging to the slide, everything is now nicely integrated.
Conclusion
The next time you decide to re-use some diagram or an image from some source, be it a website, a PDF or another slide, feel free to check out the above principles and try to invest the extra 5-10 minutes to properly prepare the image for inclusion into your slide. It’ll be well worth it and you’ll be rewarded with a much nicer slide deck to show to your audience, and they’ll be able to better listen to what you have to say, and not be distracted by poor slides.
What are your favorite image and slide massaging tips? What’s your favorite GIMP trick to make your images that extra bit nicer? Feel free to leave a comment and share your thoughts!
Commenting is currently not available, because I’d like to avoid cookies on this site. I may or may not endeavor into building my own commenting system at some time, who knows?
Meanwhile, please use the Contact form to send me your comments.
Thank you!